
Purpose: DNA is negatively charged, so when fragments of it are subjected to an electrical current, they will migrate away from the negative pole and toward the positive. This principle allows the sorting of DNA fragments by size in an agarose gel, as smaller fragments will move faster than larger ones. By using a molecular weight ruler, which will migrate known distances for size, the DNA in a sample may be calculated in comparison.
Materials Needed:
For smaller expected products, as in the GMO experiment, a more concentrated agarose gel will slow the smaller products passing through the gel during the reading phase.
- 2-3% agarose gel
- Buffer: 1x TAE (tris-acetic acid – EDTA) made up from 50x stock, ethidium bromide, and water.
Calculations: If gel volume is 50 mL and we need to make 4 gels for the class, then 200 mL of gel is required, with 1 g agarose powder per 50mL of gel making the total 4 g agarose powder.
TAE C1V1=C2V2 then (1x)(200mL)=(50x)V2 solving for V2 yields 4 mL of 50x TAE in 200 mL water to make the buffer.
Procedure:
- In a 250 mL Erlenmeyer flask, combine the TAE buffer and agarose powder. Loosely push a crumpled kimwipe into the mouth of the flask to prevent splattering. Microwave for about 3 minutes until the powder is fully dissolved, swirling gently if it starts to bubble.
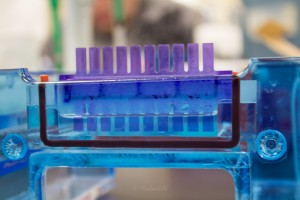
- Wet the gasket on the gel tray of the PCR box, insert at right angles to the buffer wells at the ends.
- Choose the appropriately sized comb in the slot closest to one end. For this experiment the ten card was used.
- Pour melted agarose slowly into the gel tray until it is halfway up the comb teeth.
- Allow to set fully, about 15-20 minutes at room temperature.
- Carefully remove comb.
- Pull gel tray out, and turn it so the wells made by the comb teeth are closest to the negative (black) terminal. DNA fragments are negatively charged, so they will migrate toward the positive (red) end.
- Carefully fill the buffer wells with buffer, allowing it to flow over the gel and fill the other well.
- Prepare samples.
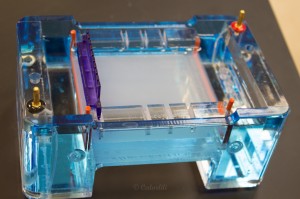
The gel turns opaque and does not move when shaken gently. At this point the comb may be removed.
Sample Materials:
Keep DNA samples on ice while preparing them.
Add 5x orange dye (gives an indication on migration rate and has glycerol to make the sample heavy and sink to the bottom of the well). The dye needs to be diluted, calculate the contents of each sample tube and use C1V1=C2V2 then (1x)(40µL)=(5x)(v2)=8 µL
Pipette 8 µL orange dye into the PCR samples.
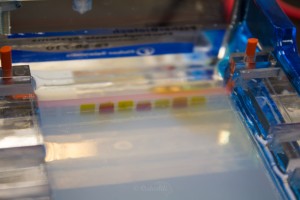
Load 20 µL of each sample into the wells as shown in Table I.
| Well # | Sample Composition | Predicted DNA results |
| 1 | Non-GMO DNA | Photosystem II |
| 2 | Non-GMO DNA | GMO |
| 3 | Cornmeal DNA | PSII |
| 4 | Cornmeal DNA | GMO |
| 5 | GMO (+) DNA | PSII |
| 6 | GMO (+) DNA | GMO |
| 7 | 20 µL Molecular Weight Ruler |
Table I
Procedure:
- Once samples are loaded into PCR box, place the lid and plug the leads into the power source. Turn it on to 110V.
- Run for 30-40 minutes.
- Turn machine off.
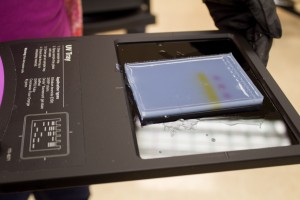
- Carefully remove gel slab to UV tray.
- Slide tray into the Gel Doc EZ Imager and close door.
- From the menu choose Gel Imaging -> Ethidium Bromide, select tray.
- Run Protocol
- Read Image
Controls for the GMO plate:
Negative control – no results (shows contamination if any results)
Positive control – has element tested for (GMO in this case)
Internal control – verifies viable DNA was extract (PSII in this case)
Results: The PCR gel indicates the presence of DNA in only one lane, the Non-GMO DNA which indicates that a fragment of about 500 bp in length was present. The remaining samples were all fragmented very small, less than 200 bp in length, a result termed ‘primer dimer’ as it means that the samples did not bind with the primer and amplify. Experimental running of the remaining DNA samples by the professor revealed that the class had been given a bad batch of Taq polymerase, resulting in poor primer yields in all four gels that were run in that phase. 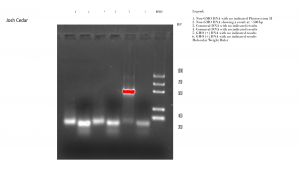


